Sampling and visualizing temperature samples is the key usecase for any set of IoT tools. If your tools can't do it easily, you should probably trow away that tools.
In this article I will show you how to use free and open-source frameworks, ThingsBoard and Mbed, to collect, send and visualize data from B-L475E-IOT01A board.
Overview
The major components are:
-
The STM32 Discovery kit is based on STM32L4 MCU. It is great choice to get all IoT-ready hardware inside single board.
The IoT kit is augmented with lots of communication chips and sensors. For the purpose of this guide, I will use the Inventek ISM43362-M3G-L44 WiFi module and ST HTS221 humidity and temperature sensor. Both WiFi and sensor chips are already placed in the IoT kit, no external connections are required.
-
I called it Mbed framework. It makes things a lot easier when you developing embedded applications. Mbed main website says enough about it: "The Arm Mbed IoT Device Platform is a fully integrated device management solution. It provides the operating system, gateway, device management services, and partner ecosystem to speed adoption and deployment of IoT solutions.".
-
ThingsBoard is an open-source IoT platform with the out-of-the-box data visualization and nice looking UI. It can be either installed locally, deployed in a cloud provider or used directly via ThingsBoard demo servers. In any case it is completely free to use.
For demonstrating purposes I will use ThingsBoard Demo instance. Obviously, I will use it to receive, store and visualize temperature and humidity samples.
In the course of this guide, I assume you are running Ubuntu Linux. If you are not, then consider the challenge of executing instructions within your favorite OS as your personal homework. Leave me a comment below this article in case you have troubles completing the guide elsewhere.
Also, some commands require sudo. Again, it is up to you to discover which should be started with superuser permissions and which should not.
TL;DR
Final result can be found in the summary section below and the end of the page.
Installing prerequisites
Few packages can be installed directly from Ubuntu repositories, such as GCC toolchain or Minicom terminal.
$ apt-get install autoconf libusb-1.0-0-dev git gcc-arm-none-eabi \
        python-pip cmake minicom mercurial mosquitto-clients
Creating ThingsBoard device and dashboard
Before any data will be sent to the IoT platform, you need to create and setup the ThingsBoard account. Proceed with steps below to achieve that.
Open http://demo.thingsboard.io website and register your account by clicking on "CREATE AN ACCOUNT" button:.
Fill your contact name, email and password. Proceed withinstructions, sent to you via email. When finished, go to http://demo.thingsboard.io again and login with your new account credentials:
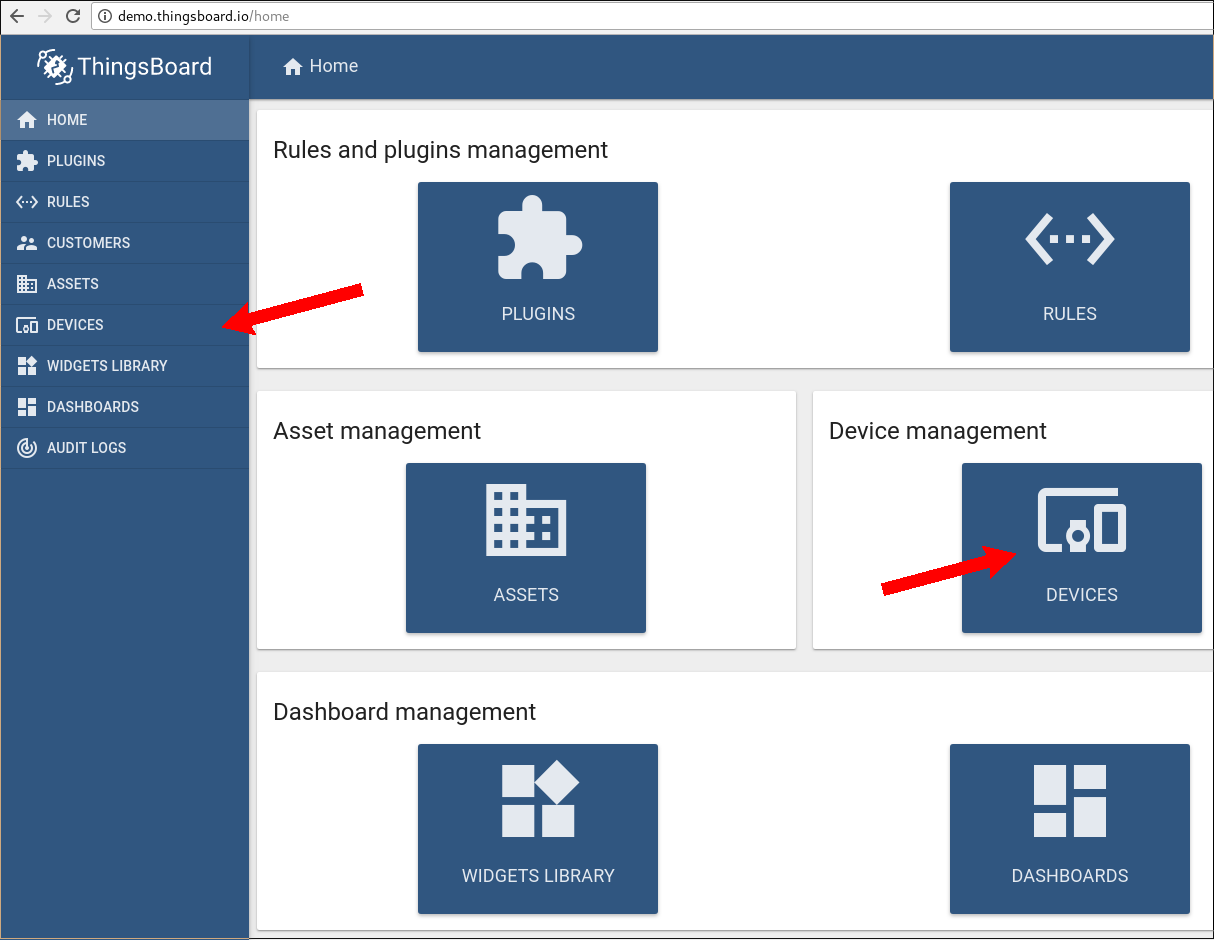
In the Home page click on "Devices" button. Device page should open:
In the Device page, click on the red "+" button at right-bottom of the screen.
Name your device as you like. I went with "STM32 IoT Kit" name. Remember that name, we will you it in future. After name is entered, click on "Add button".
Your device should now appear in the Device page. Click on your device button. Sidebar will be opened with the device settings.
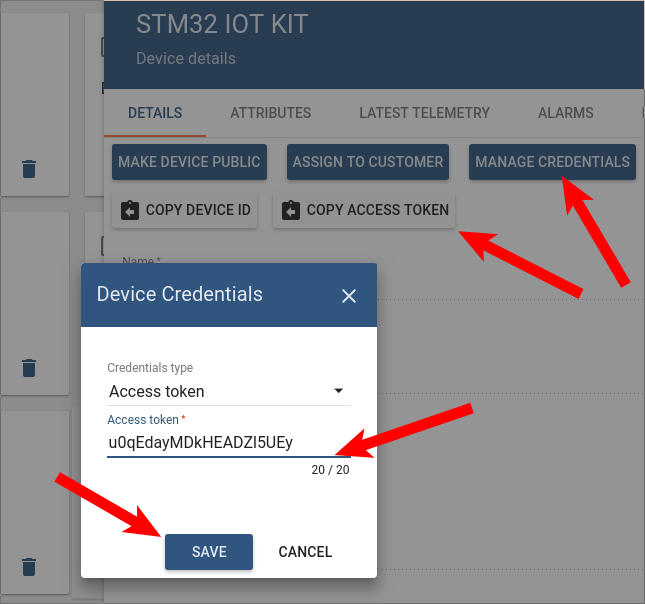
On the device settings sidebar, click "Copy access token" or copy-and-paste access token after clicking on "Manage credentials" button:
After device is created and access token is obtained, it is time to send some test data to validate that everything is installed correctly. Open your console and execute (change <YOUR_ACCESS_TOKEN_HERE> with actual token received in the previous step`):
Warning
This step is extremely important, do not proceed any further until you will be sure all works as needed and you can send your test data.
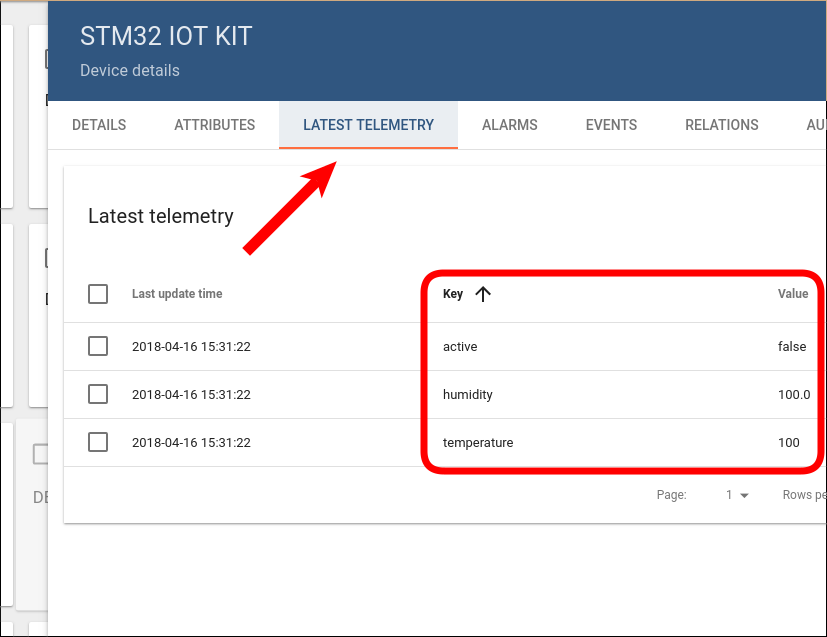
$ mosquitto_pub -h demo.thingsboard.io -t "v1/devices/me/telemetry" -u "<YOUR_ACCESS_TOKEN_HERE>" -m '{"temperature":100, "humidity":100.0, "active": false}'
Now, open the "Telemetry tab" in the device settings. You should able to see data you've sent few moments ago:
After you validated that data indeed sent, you can start with creating dashboard. Click on "Dashboards" button on the left side of the screen. Dashboard page will be opened.
On the Dashboard page, click red "+" button at the right-bottom of the screen. Few more buttons will pop-up. Click on "Create new dashboard button".
Choose a name for dashboard as you like. I decided to go with "STM32 IoT Kit dashboard". When finish, click "Add" button. Dashboard should appear in the Dashboards page.
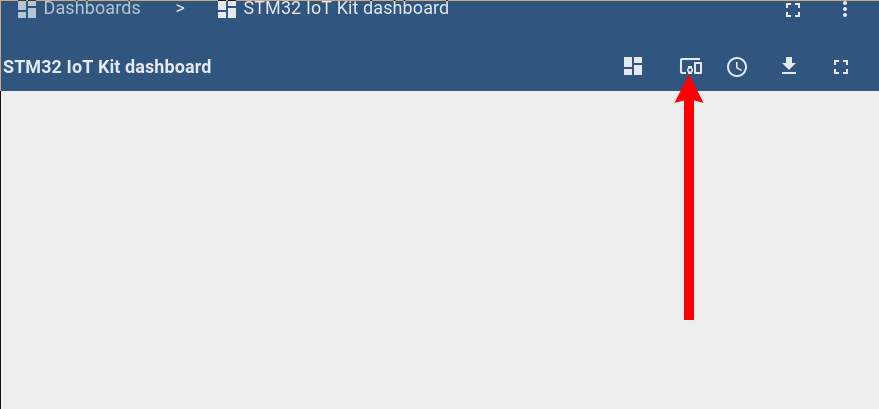
Click on newly created dashboard button. You will be directed to a dashboard widget page.
Click on red "Edit" button at the right-bottom of the screen.
Click on "Entity alias" button at the top of the page. "Entity aliases" window will appear:
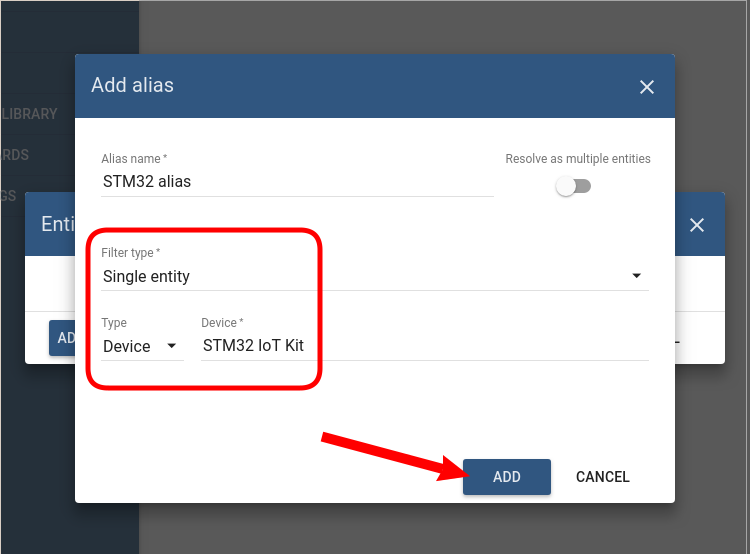
In the "Entity alias" window, click blue "Add alias" button. Popup with alias details will appear.
Fill new alias details. "Alias name" is required, but can be arbitrary. Set "Filter type" to "Single entity", "Type" must be set to "Device". In the drop-down right after "Type" field, select our IoT kit name. That name must match the name of the device we have created previously. Click "Add" button:
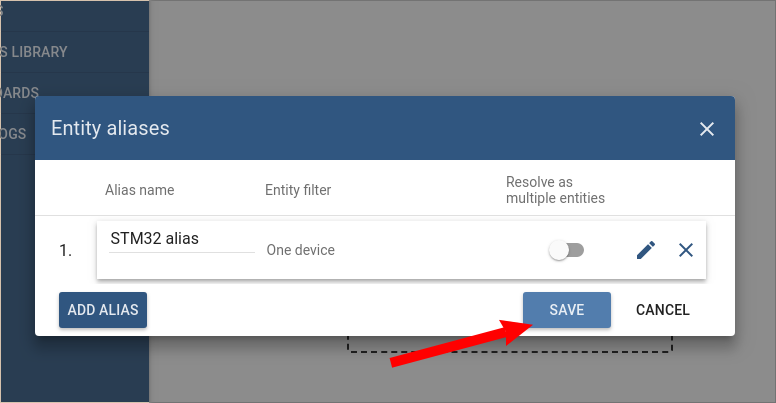
In the "Entity alias" window, click "Save" button. You will be directed to the dashboard window:
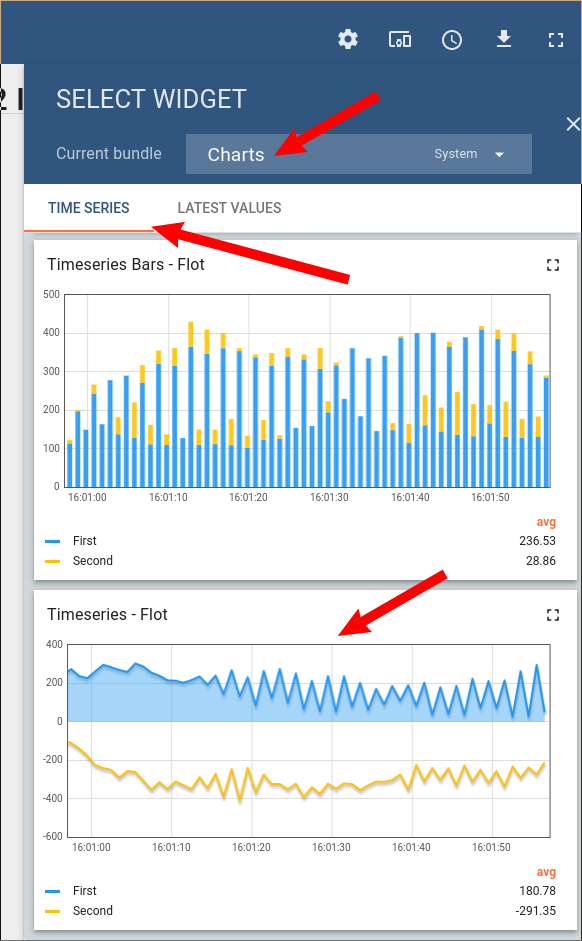
Your dashboard will be in edit mode after you finish with aliases. Click on "Add new widget" label at the center or on red "+" button at the bottom-right. "Select widget" menu will appear.
In the "Select widget" menu, select the "Charts" widget bundle from drop-down list and scroll down to "Timeseries - Flot" widget. Click directly on the widget. The "Add widget" window will appear:
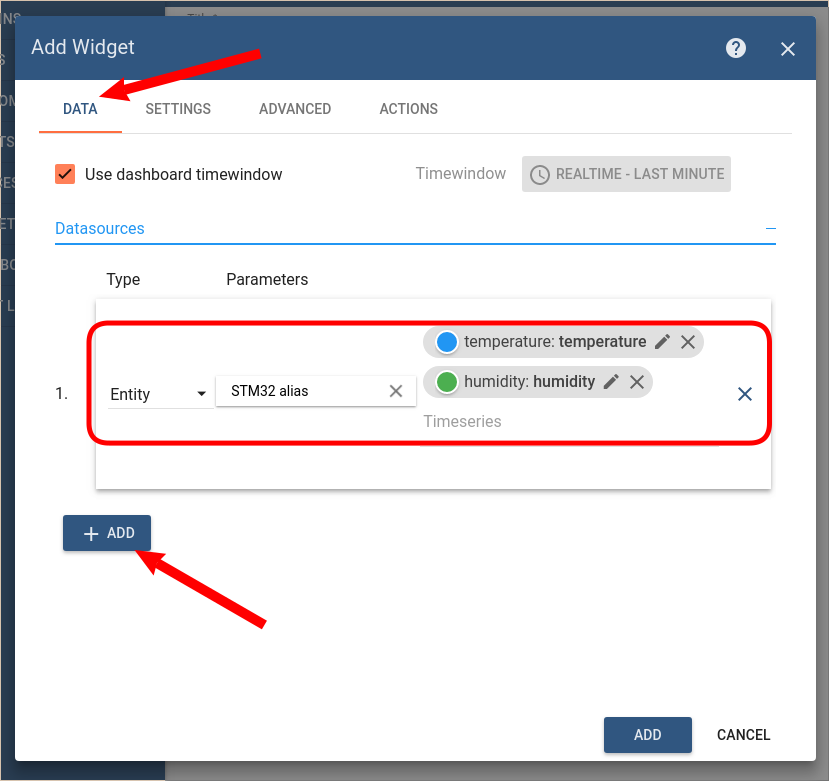
On the "Data" tab of the "Add widget" window, click on blue "Add" button, right below "PLEASE ADD DATASOURCE" text.
In new data source, select "Entity" in "Type" field and your entity alias (created few steps ago) in the "Parameters" field. Lastly, select "temperature" and "humidity" data in the "Timeseries" right-most field. You widget setting now should look like on the screenshot below. Click "Add" button at the bottom of the window to add widget:
In the dashboard page, click "Apply changes" at the bottom-right of the screen.
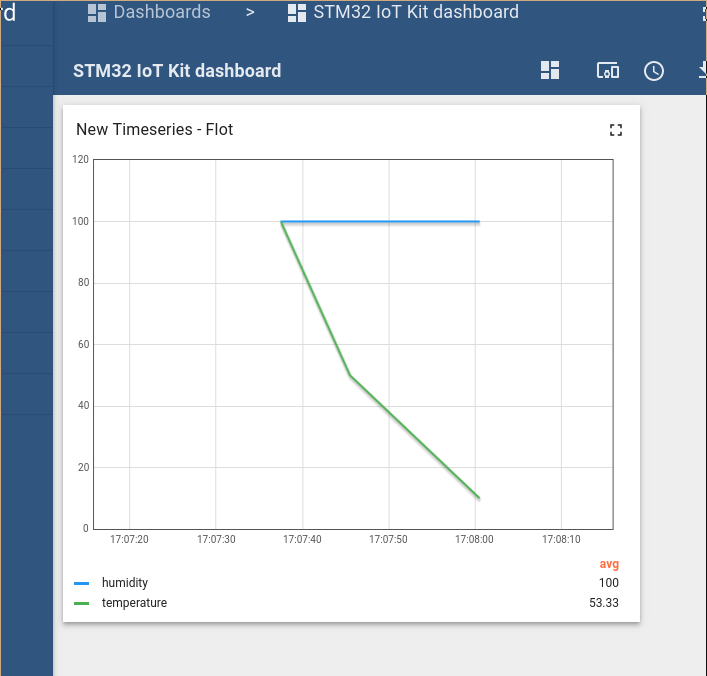
With all ThingsBoard settings configured, let's validate telemetry one more time. Open your shell, and send some test data, few samples in a row. (change <YOUR_ACCESS_TOKEN_HERE> with actual device token received when device was first added to the ThingsBoard):
# Send temperature 100
$ mosquitto_pub -h demo.thingsboard.io -t "v1/devices/me/telemetry" -u "<YOUR_ACCESS_TOKEN_HERE>" -m '{"temperature":100, "humidity":100.0, "active": false}'

# Send temperature 50
$ mosquitto_pub -h demo.thingsboard.io -t "v1/devices/me/telemetry" -u "<YOUR_ACCESS_TOKEN_HERE>" -m '{"temperature":50, "humidity":100.0, "active": false}'

# Send temperature 10
$ mosquitto_pub -h demo.thingsboard.io -t "v1/devices/me/telemetry" -u "<YOUR_ACCESS_TOKEN_HERE>" -m '{"temperature":10, "humidity":100.0, "active": false}'
Open your web-browser again. Now, you should observe nice-looking graph, representing the test data:
Install ST-link software
ST-Link is used for programming and debugging STM32 MCUs. By default, it is not present in Ubuntu, so it must be compiled and installed from source. Proceed as follows.
Download:
$ cd ~
$ git clone git://github.com/texane/stlink.git
$ cd stlink
Build:
$ cd stlink
$ make

# Some log output is skipped

Scanning dependencies of target usb
[ 86%] Building C object tests/CMakeFiles/usb.dir/usb.c.o
[ 90%] Linking C executable usb
[ 90%] Built target usb
Scanning dependencies of target flash
[ 93%] Building C object tests/CMakeFiles/flash.dir/flash.c.o
[ 96%] Building C object tests/CMakeFiles/flash.dir/__/src/tools/flash_opts.c.o
[100%] Linking C executable flash
[100%] Built target flash
Install:
$ mkdir /opt/stlink
$ cd /opt/stlink
$ cp ~/stlink/build/Release/st-flash /opt/stlink
$ cp ~/stlink/build/Release/src/gdbserver/st-util /opt/stlink
Setup Mbed and test blinky code
Install mbed-cli, the command line interface for Mbed:
$ pip install mbed-cliConfigure Mbed to use previously installed toolchain:
$ mbed config -G GCC_ARM_PATH /usr/bin/

[mbed] /usr/bin/ now set as global GCC_ARM_PATH
Create Mbed-based project:
$ cd ~
$ mbed new --program thingsboard-l475vg-iot01a

[mbed] Creating new program "thingsboard-l475vg-iot01a" (git)
[mbed] Adding library "mbed-os" from "https://github.com/ARMmbed/mbed-os" at branch/tag "latest"
[mbed] Updating reference "mbed-os" -> "https://github.com/ARMmbed/mbed-os/#f9ee4e849f8cbd64f1ec5fdd4ad256585a208360"
[mbed] Auto-installing missing Python modules...
Enter new project directory and download rest of Mbed libraries:
$ cd thingsboard-l475vg-iot01a

# MQTT library
$ mbed add http://os.mbed.com/teams/mqtt/code/MQTT/

[mbed] Adding library "MQTT" from "https://os.mbed.com/teams/mqtt/code/MQTT" at latest revision in the current branch
[mbed] Adding library "MQTT/FP" from "https://mbed.org/users/sam_grove/code/FP" at rev #3c62ba1807ac
[mbed] Adding library "MQTT/MQTTPacket" from "https://mbed.org/teams/mqtt/code/MQTTPacket" at rev #aedcaf7984d5
[mbed] Updating reference "MQTT" -> "https://os.mbed.com/teams/mqtt/code/MQTT/#9cff7b6bbd01"

# WiFi driver
$ mbed add https://github.com/ARMmbed/wifi-ism43362/#c342bde7061f99338b8082f2cd39fe70cd7c70dc

[mbed] Adding library "wifi-ism43362" from "https://github.com/ARMmbed/wifi-ism43362" at rev #c342bde7061f
[mbed] Updating reference "wifi-ism43362" -> "https://github.com/ARMmbed/wifi-ism43362/#c342bde7061f99338b8082f2cd39fe70cd7c70dc"

# HTS221 sensor driver
$ mbed add mbed add http://os.mbed.com/teams/ST/code/HTS221/

[mbed] Adding library "HTS221" from "https://os.mbed.com/teams/ST/code/HTS221" at latest revision in the current branch
[mbed] Adding library "HTS221/ST_INTERFACES" from "https://developer.mbed.org/teams/ST/code/ST_INTERFACES" at rev #d3c9b33b992c
[mbed] Adding library "HTS221/X_NUCLEO_COMMON" from "https://developer.mbed.org/teams/ST/code/X_NUCLEO_COMMON" at rev #21096473f63e
[mbed] Updating reference "HTS221" -> "https://os.mbed.com/teams/ST/code/HTS221/#312ee2694a77"
Create empty main.cpp file and project configuration file, called mbed_app.json:
$ touch main.cpp
$ touch mbed_app.json
Open mbed_app.json file with your favorite editor and placed there following JSON code. This JSON file will tell Mbed how to configure all project parts, so they can work with our IoT kit.
{
    "macros": [
        "MBED_CONF_APP_MAIN_STACK_SIZE=6000",
        "MBED_CONF_APP_THREAD_STACK_SIZE=6000",
        "DEVICE_STDIO_MESSAGES=1"
    ],
    "config": {
        "wifi-shield": {
            "help": "Options are internal, WIFI_IDW0XX1",
            "value": "internal"
        },
        "wifi-tx": {
            "help": "TX pin for serial connection to external device",
            "value": "D1"
        },
        "wifi-rx": {
            "help": "RX pin for serial connection to external device",
            "value": "D0"
        },
        "wifi-spi_miso": {
            "help": "SPI-MISO connection to external device",
            "value": "PC_11"
        },
        "wifi-spi_mosi": {
            "help": "SPI-MOSI connection to external device",
            "value": "PC_12"
        },
        "wifi-spi_sclk": {
            "help": "SPI-CLOCK connection to external device",
            "value": "PC_10"
        },
        "wifi-spi_nss": {
            "help": "SPI chip select of external device",
            "value": "PE_0"
        },
        "wifi-reset": {
            "help": "WIFI module reset pin",
            "value": "PE_8"
        },
        "wifi-dataready": {
            "help": "WIFI module data ready pin",
            "value": "PE_1"
        },
        "wifi-wakeup": {
            "help": "WIFI module wakeup pin",
            "value": "PB_12"
        }
    },
    "target_overrides": {
        "*": {
            "platform.stdio-baud-rate": 115200,
            "platform.stdio-convert-newlines": true
        },
        "DISCO_L475VG_IOT1A": {
            "wifi-spi_miso": "PC_11",
            "wifi-spi_mosi": "PC_12",
            "wifi-spi_sclk": "PC_10",
            "wifi-spi_nss": "PE_0",
            "wifi-reset": "PE_8",
            "wifi-dataready": "PE_1",
            "wifi-wakeup": "PB_12"
        }
    }
}
Open main.cpp file with your favorite editor and add there simple blinky code. We will that code to verify that everything works as expected:
// main.cpp:

#include "mbed.h"

DigitalOut led1(LED1);

int main()
{
    while (true)
    {
        printf("Blink!\n");
        led1 = !led1;
        wait(1);
    }
}
Compile blinky code:
$ mbed compile -m DISCO_L475VG_IOT01A -t GCC_ARM

Scan: .
Scan: env
Scan: mbed
Compile [  0.3%]: AnalogIn.cpp
Compile [  0.5%]: BusIn.cpp
Compile [  0.8%]: BusInOut.cpp
Compile [  1.0%]: main.cpp

# ...
# More log output here
# ...

Compile [100.0%]: test_env.cpp
Link: thingsboard-l475vg-iot01a
Elf2Bin: thingsboard-l475vg-iot01a
+------------------+-------+-------+------+
| Module           | .text | .data | .bss |
+------------------+-------+-------+------+
| [fill]           |    67 |     0 |   14 |
| [lib]/c.a        | 24460 |  2204 |   56 |
| [lib]/gcc.a      |  3752 |     0 |    0 |
| [lib]/m.a        |    88 |     0 |    0 |
| [lib]/misc       |   296 |    16 |   28 |
| main.o           |    95 |     4 |   28 |
| mbed-os/drivers  |   182 |     4 |  100 |
| mbed-os/hal      |  1553 |     4 |   68 |
| mbed-os/platform |  2215 |   256 |  149 |
| mbed-os/rtos     | 10117 |   168 | 7977 |
| mbed-os/targets  | 10839 |     8 |  876 |
| Subtotals        | 53664 |  2664 | 9296 |
+------------------+-------+-------+------+
Total Static RAM memory (data + bss): 11960 bytes
Total Flash memory (text + data): 56328 bytes

Image: ./BUILD/DISCO_L475VG_IOT01A/GCC_ARM/thingsboard-l475vg-iot01a.bin
Flash L475VG IoT board using st-utils:
$ /opt/stlink/st-flash --reset write ./BUILD/DISCO_L475VG_IOT01A/GCC_ARM/thingsboard-l475vg-iot01a.bin 0x08000000Take a look on your board. You should see the LED flashing:
Open minicom to make sure that console works as expected:
$ minicom -D /dev/ttyACM0In the minicom window, you should able to see Blink! message emerging every one second:
Blink!
Blink!
Blink!

# ...
Optionally, exit minicom by hitting CTRL-A Z
Connecting to WiFi
When all libraries are in place, it is time to start connecting to the network.
Modify your main.cpp as shown below and do not forget to change <YOUR_WIFI_NETWORK_HERE> with your WiFi network name and <YOUR_WIFI_NETWORK_PASSWORD_HERE> with your WiFi password:
// main.cpp

#include "mbed.h"
#include "ISM43362Interface.h"

// Definitions ---------------------------------------------------------

// Change it with your WiFi network name
#define WIFI_NETWORK_NAME       "<YOUR_WIFI_NETWORK_HERE>"
// Change it with your WiFi password name
#define WIFI_NETWORK_PASSWORD   "<YOUR_WIFI_NETWORK_PASSWORD_HERE>"
#define WIFI_SECURITY           NSAPI_SECURITY_WPA_WPA2

int main()
{
    int count = 0;

    ISM43362Interface wifi(MBED_CONF_APP_WIFI_SPI_MOSI,
            MBED_CONF_APP_WIFI_SPI_MISO,
            MBED_CONF_APP_WIFI_SPI_SCLK,
            MBED_CONF_APP_WIFI_SPI_NSS,
            MBED_CONF_APP_WIFI_RESET,
            MBED_CONF_APP_WIFI_DATAREADY,
            MBED_CONF_APP_WIFI_WAKEUP, false);

    // Scanning WiFi networks ------------------------------------------

    WiFiAccessPoint *ap;

    count = wifi.scan(NULL, 0);
    printf("%d networks available.\n", count);

    /* Limit number of network arbitrary to 15 */
    count = count < 15 ? count : 15;

    ap = new WiFiAccessPoint[count];
    count = wifi.scan(ap, count);
    for (int i = 0; i < count; i++) {
        printf("Network: %s RSSI: %hhd\n", ap[i].get_ssid(), ap[i].get_rssi());
    }

    delete[] ap;

    // Connecting to WiFi network --------------------------------------

    printf("\nConnecting to %s...\n", WIFI_NETWORK_NAME);
    int ret = wifi.connect(WIFI_NETWORK_NAME, WIFI_NETWORK_PASSWORD, WIFI_SECURITY);
    if (ret != 0) {
        printf("\nConnection error\n");
        return -1;
    }

    printf("Success\n\n");
    printf("MAC: %s\n", wifi.get_mac_address());
    printf("IP: %s\n", wifi.get_ip_address());
    printf("Netmask: %s\n", wifi.get_netmask());
    printf("Gateway: %s\n", wifi.get_gateway());
    printf("RSSI: %d\n\n", wifi.get_rssi());

    return 0;
}
Compile and run application:
$ mbed compile -m DISCO_L475VG_IOT01A -t GCC_ARM
$ /opt/stlink/st-flash --reset write ./BUILD/DISCO_L475VG_IOT01A/GCC_ARM/thingsboard-l475vg-iot01a.bin  0x08000000
Check your minicom console:
$ minicom -D /dev/ttyACM0You should able to see something like that:
4 networks available.
Network: BLA RSSI: -96
Network: cell RSSI: -79
Network: ASUS RSSI: -43

Connecting to ASUS...
Success

MAC: C1:7B:51:04:2A:8F
IP: 192.168.43.160
Netmask: 255.255.255.0
Gateway: 192.168.43.1
RSSI: -43
Optionally, exit minicom by hitting CTRL-A Z
Connecting to ThingsBoard via MQTT
Again, open main.cpp file with editor you like and execute following instructions:
Include MQTT library and required network-related headers to the top of the file:
#include "TCPSocket.h"
#include "MQTTmbed.h"
#include "MQTTClient.h"
Add some MQTT-related definitions below the include section:
#define MQTT_HOST               "demo.thingsboard.io"
#define MQTT_PORT               1883
#define MQTT_TOPIC              "v1/devices/me/telemetry"
Add network class below include section. It must be present to allow MQTT library use Mbed network interfaces:
// Network adapter for Paho MQTT library -------------------------------

class MQTTNetwork
{
public:
    MQTTNetwork(NetworkInterface* aNetwork) : network(aNetwork) {
        socket = new TCPSocket();
    }

    ~MQTTNetwork() {
        delete socket;
    }

    int read(unsigned char* buffer, int len, int timeout) {
        return socket->recv(buffer, len);
    }

    int write(unsigned char* buffer, int len, int timeout) {
        return socket->send(buffer, len);
    }

    int connect(const char* hostname, int port) {
        socket->open(network);
        return socket->connect(hostname, port);
    }

    int disconnect() {
        return socket->close();
    }

private:
    NetworkInterface* network;
    TCPSocket* socket;
};
Add MQTT code at the end of main() function, and do not forget to change <YOUR_ACCESS_TOKEN_HERE> with your ThingsBoard device token!
// Connect to ThingsBoard ----------------------------------------------

MQTTNetwork network(&wifi);
MQTT::Client<MQTTNetwork, Countdown> client(network);

char assess_token[] = "<YOUR_ACCESS_TOKEN_HERE>";

MQTTPacket_connectData conn_data = MQTTPacket_connectData_initializer;
conn_data.username.cstring = assess_token;

if (network.connect(MQTT_HOST, MQTT_PORT) < 0) {
    printf("failed to connect to " MQTT_HOST  "\n");
    return -1;
}

if (client.connect(conn_data) < 0) {
    printf("failed to send MQTT connect message\n");
    return -1;
}

printf("successfully connect!\n");

client.disconnect();
wifi.disconnect();

printf("\ndone\n");
return 0;
Compile and run application:
$ mbed compile -m DISCO_L475VG_IOT01A -t GCC_ARM
$ /opt/stlink/st-flash --reset write ./BUILD/DISCO_L475VG_IOT01A/GCC_ARM/thingsboard-l475vg-iot01a.bin  0x08000000
Check your minicom console:
$ minicom -D /dev/ttyACM0You should able to see something like that:
4 networks available.
Network: BLA RSSI: -96
Network: cell RSSI: -79
Network: ASUS RSSI: -43

Connecting to ASUS...
Success

MAC: C1:7B:51:04:2A:8F
IP: 192.168.43.160
Netmask: 255.255.255.0
Gateway: 192.168.43.1
RSSI: -43

successfully connect!

done
Optionally, exit minicom by hitting CTRL-A Z
Sampling HTS221 sensor and sending data to ThingsBoard
Finally, add some code to work with HTS221:
Include HTS221 sensor driver in the include section:
#include "HTS221Sensor.h"
Add initialization and sampling code below printf("successfully connect!\n"); line. Temperature and humidity will be sampled every 5 seconds (see wait_ms() call):
// Initialize sensors --------------------------------------------------

uint8_t id;
DevI2C i2c_2(PB_11, PB_10);
HTS221Sensor hum_temp(&i2c_2);

hum_temp.init(NULL);
hum_temp.enable();
hum_temp.read_id(&id);
printf("HTS221  humidity & temperature sensor = 0x%X\r\n", id);

// Get data from sensors -----------------------------------------------

for (;;) {
    float temp, humid;

    hum_temp.get_temperature(&temp);
    hum_temp.get_humidity(&humid);
    printf("HTS221:  [temp] %.2f C, [hum]   %.2f%%\r\n", temp, humid);

    char msg[256];
    int n = snprintf(msg, sizeof(msg),
        "{\"temperature\":%f, \"humidity\":%f, \"active\": false}",
        temp, humid);

    void *payload = reinterpret_cast<void*>(msg);
    size_t payload_len = n;

    printf("publish to: %s %d %s\r\n", MQTT_HOST, MQTT_PORT, MQTT_TOPIC);

    if (client.publish(MQTT_TOPIC, payload, n) < 0) {
        printf("failed to publish MQTT message");
    }

    wait_ms(5000);
}
Compile and run application:
$ mbed compile -m DISCO_L475VG_IOT01A -t GCC_ARM
$ /opt/stlink/st-flash --reset write ./BUILD/DISCO_L475VG_IOT01A/GCC_ARM/thingsboard-l475vg-iot01a.bin  0x08000000
Check your minicom console:
$ minicom -D /dev/ttyACM0You should able to see data samples:
# Network connection logs are skipped for clarity

successfully connect!

HTS221  humidity & temperature sensor = 0xBC
HTS221:  [temp] 28.20 C, [hum]   36.20%
publish to: demo.thingsboard.io 1883 v1/devices/me/telemetry
HTS221:  [temp] 28.20 C, [hum]   36.10%
publish to: demo.thingsboard.io 1883 v1/devices/me/telemetry
HTS221:  [temp] 28.20 C, [hum]   36.20%
publish to: demo.thingsboard.io 1883 v1/devices/me/telemetry
HTS221:  [temp] 28.20 C, [hum]   36.20%
publish to: demo.thingsboard.io 1883 v1/devices/me/telemetry
HTS221:  [temp] 28.30 C, [hum]   36.20%
publish to: demo.thingsboard.io 1883 v1/devices/me/telemetry
Open your dashboard in http://demo.thingsboard.io, and check that data indeed delivered, every five second:
Summary
For everyone who reached here: I salute you! Now you have couple more awesome tools and tricks in your IoT toolbox.
If something gone wrong, or you just want to have a code to compare with, I have uploaded whole ThingsBoard B-L475E-IOT01A code to GitHub Gists.
Among files in Gist, there is the ThingsBoard dashboard for B-L475E-IOT01A that I've exported. You can import that dashboard in your account, using dashboard importing feature.
Happy IoT'ing!
Comments
comments powered by Disqus